Thursday, February 26, 2009

Random Image Web Part

Focal3Random Image Web Part displays randomly chosen Image. The Web Part takes as parameters URL of the Image Library containing images you would like to display. It is also possible to input multiple URL's separated by comma. Additional parameters you can set are: image width and height, in-line CSS style (like border, etc.), image link (you can make image point to the library where all the images are being shown) and the alternate text.


Click this link to download the dll for Focal3RandomImage web part


GAC it the Focal3RandomImage .dll and paste the following code in tag your web.config file


< SafeControl Assembly="Focal3RandomImage, Version=1.0.0.0, Culture=neutral, PublicKeyToken=fd89fa4a8c9d5760" Namespace="Focal3RandomImage.SharePoint.WebParts" TypeName="*" Safe="True" />

Replace the XXXXXXXXXXXXXX with publickeyToken value from GAC.


Import the Webpart From Home Site-->Site Settings-->Modify All Site Settings--> Web Parts -->New


Choose the Focal3RandomImage Web part and Populate it .


Add the Web Part in the Page From Web Part Gallery


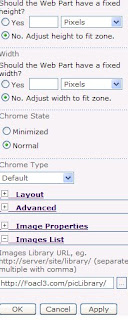
Set The Picture Library Name with full Path(Example http://focal3.com/piclibraray/) and click Ok then Publish


The Web Part Will look like the following Image


While Refreshing or reloading the page the images will change randomly based on the picture library.


Wednesday, February 25, 2009

Setting up Content Contribute and Content Approve permission to different users

Requirement : Need to set up content 'Contribute' permission for one user and another user for Content 'Approve' permission

Solution

Please note that users available in Active Directory can act as the users of MOSS application.That means, the users available in SiteActions-> Site Setting->People and Groups.

This menu item available only after enabling Publishing Feature of MOSS

1) Set up the users in Active Directory.

2) Take SiteActions-> Site Setting->People and Groups.

3) Click on 'All People' menu item available in left side menu.


4) Add new user with 'Contribute' permission from drop down or select radio button 'Give User Permission Directly' and check the check box 'Contribute'


5) Repeat step 1 to Step 2 to add a new user as “approver' of the added content

6) Add new user with 'Approve' permission from drop down or select radio button 'Give User Permission Directly' and check the check box 'Approve


7) Then take the site/ sub site where you need to implement above feature

8) Click Site Actions-> Site Settings->Modify Pages and Library Settings

9) Click on 'Versioning Settings' link comes under 'General Settings'


10) In Content Approval section radio button 'Require Content Approval for Submitted Items' to 'Yes'.


11) Then Try to login as 'contributor' and try to edit the content in any page. One can see a button at top of the page “submit for Approval' click on it

12) Then Login as 'Approver' and take the above same page, submitted for approval.

13) Click 'Approve' button.

14) Then changes will reflect in page.

Note : -

If there are sub sites in web portal, the above steps has to be followed in all sub site to enable this feature


Enjoy


Set Permissions for Sub Site

Give user permissions to individual sub sites

You have a MOSS site http://Userpermisions.com/. In that site, owner and administrator name is admin.
You have sub site http://Userpermisions.com/arun/. For this particular sub site(arun) you need to give contributor permission to another user(Ex:arun). This user have only contribute permission in only this particular (http://Userpermisions.com/arun/) site, not other sites. For this you need to do the following steps to give these kind of permissions

1) Login with admin user
2) go to the particular site (http://Userpermisions.com/arun/)
3) Click on Site Actions --> Site Settings --> Modify All Site Settings
4) Click on Advanced Permissions(Under Users and Permissions)

5) Click on Actions --> Edit Permissions

6) Popup window will appear

7) Click Ok to Continue

8) Now you will get an additional tab "Settings"

9)Click on New --> Add User

10) Give the user name in Users/Groups and "Give User Permissions Directly"

11) And then Click Ok

12) Now the user was added in that particular site

Note:If you have another subsite in that site (Ex:http://UserPermissions/arun/kumar/), the user arun will appear in that both

If you no need in that sub site kumar just Remove the user name from that sub site(Actions-->Remove User Permissions)

13) Click Actions -->Inherit Permissions

permissionpopup


14) Click OK to finish this process

15) Now you can check the user name arun will work with contributor permission in only the site http://userpermission/arun


Tuesday, February 24, 2009

Optimizing MOSS 2007 Application

I.Using Disk Based Caching(Binary Large Objects -BLOB)

1.Open the web.configFile(DefaultPath:C:\Inetpub\wwwroot\wss\VirtualDirectories\80) in suitable editor.
2.Look for the below entry in Web.config for the site and enabled attributed is set to false by default.
<BlobCache location="C:\blobCache" path="\.(gifjpgpngcssjs)$" maxSize="10" enabled="false" />
3.Set enabled="true"
4.To change the size of the Cache ,change the value of maxSize.Default Size is 10 GB if not much
much size in Current Directory then change the value of location to some other Directory .
5.To add new file types to the BLOB cache, type the file type next to the other file types. Separate each file type with a pipe () character as shown in the file.
6 Another parameter max-age specifies the maximum amount of time in seconds that the client browser caches BLOBs downloaded to the client computer; Set max-age="3600"
After adding all the parameters and values the BlobCache entry will look like below
<BlobCache location="C:\blobCache" path="\.(gifjpgpngcssjs)$" maxSize="10" enabled="true" max-age="3600" />

II. Enabling Cache-Control in HTTP Headers

1.In the ISS and RightClick the Virtual directory of your web application
2.Click on Property Menu item and Select “Http Header ”tab


3.Click Add button ,
enter Custom header name: cache-control
Custom Header Value :- max-age=3600, no-check


4.Click Ok

Thursday, February 19, 2009

Convert a value to uppercase or lower case in XSLT

First lets place all the letters of the alphabet, lower case and upper case in two seperate variables.

<xsl:variable name="lcletters">abcdefghijklmnopqrstuvwxyz</xsl:variable>

<xsl:variable name="ucletters">ABCDEFGHIJKLMNOPQRSTUVWXYZ</xsl:variable>

The variable/data we have to covert is/in toconvert

For converting our data to upper case or lower case we can use the translate method

like

1.For converting to uppercase

<xsl:value-of select="translate($toconvert,$lcletters,$ucletters)"/>

2.For converting to lower case

<xsl:value-of select="translate($toconvert,$ucletters,$lcletters)"/>

Wednesday, February 18, 2009

Create a Feature: Master Pages for Site Collections

Create a Feature: Add Custom Master Pages to your Site Collections :-

Please go through the URL. It is really useful

http://www.heathersolomon.com/blog/articles/servermstpageforsitecollect_feature.aspx

Enjoy

Tuesday, February 17, 2009

Enable SSL for selected Pages in MOSS

An article on automatically switching between HTTP and HTTPS protocols without hard-coding absolute URLs


I came across a change request of my client who wants to enable SSL on selected pages in MOSS site collection. we all know that we can create SSL enabled web application from scratch. But here the requirement is unique and client requirement says he should be able to Enable SSL on pages of his choice. So it should be configurable and at same time we should be able to maintain session state across http and https. Amazingly MOSS has that ability to support session state when switching across HTTP and HTTPS. I followed the steps below and was able to achieve result

1) Wrote a custom HTTP handler which redirects http to https for selected pages.


2) The page list is read from web.config file.

****** Source code for HTTP handler************************

using System;

using System.Collections.Generic;

using System.Linq;


using System.Text;

using System.Web.Security;

using System.Diagnostics;


namespace Arun.ForceSSL

{

public class ForceSSL : System.Web.IHttpModule

{

#region IHttpModule Members


public void Dispose()

{

throw new NotImplementedException();

}


public void Init(System.Web.HttpApplication context)

{


context.BeginRequest += new EventHandler(context_BeginRequest);


}


#endregion


void context_BeginRequest(object sender, EventArgs e)

{

RedirectSSL(System.Web.HttpContext.Current.Request.Url.PathAndQuery);


}

public void RedirectSSL(string pageURL)

{

//check for the current page exists in the group of pages requiring SSL

//if page is found in ssl group then redirect using https:// otherwise redirect with http://

bool found = false;


string sslPages = System.Configuration.ConfigurationSettings.AppSettings["SSLPages"];

char[] separator;

separator = new char[] { ‘,’ };

string[] pages;

pages = sslPages.Split(separator);

for (int i = 0; i < pages.Length; i++)


{


if( pageURL.ToLower().Contains(pages[i].ToLower()))

{

found = true;

break;

}


}

if (found)

{

if (System.Web.HttpContext.Current.Request.Url.Scheme.ToString() == “http”)

{

string sURL = System.Web.HttpContext.Current.Request.Url.ToString();


sURL = sURL.Replace(”http://”, “https://”);

System.Web.HttpContext.Current.Response.Redirect(sURL);


}

}

else

{


if (System.Web.HttpContext.Current.Request.Url.Scheme.ToString() == “https”)

{

string sURL = System.Web.HttpContext.Current.Request.Url.ToString();

sURL = sURL.Replace(”https://”, “http://”);

System.Web.HttpContext.Current.Response.Redirect(sURL);

}


}


}

}


}

**********************************Source code for Http handler ends**************

4) Sign this assembly and GAC it.


5) Add this line <httpmodules> section and see that this line is first among all


< name=”ForceSSL” type=”Arun.ForceSSL.ForceSSL, ForceSSL,Version=1.0.0.0, Culture=neutral,PublicKeyToken=xxxxxxxx”>

Add key in Appsettings of web.config file like this.

< key=”SSLPages” value=”/SitesWithSSL/Pages/SSL1.html,/subsite/Pages/SSL1.aspx”>

we can add as many pages we need for this. All these pages would be SSL enabled.


6)Now come to IIS–>WebApplication which needs SSL enabling for selected pages


7)Navigate to Properties–Directory Settings–Secure Communications–Server Certificate–>Assign the existing certificate.

More Details on SSL enabling


8)Assign port 443 for SSL ( we can choose port of our choice, but we should be aware that 443, 80 doesnt require ports to be mentioned in URL, otherwise we have to tweak our code settings to read through those ports)


9)Please be sure that in Directory settings–>SecureCommunications–>Edit–>Require Secure Channel is NOT SELECTED.


10)Now come back to Central Administration–>Operations–>Alternate Access Mappings


11)Add the new URL via internal URL’s link.

https://servername//.


12)Perform IISReset–>Now Browse Application..


we can see our selected pages(as specified in web.config) are over SSL mode and the rest are under normal HTTP.

Thursday, February 12, 2009

Enable SSL in a site - Part 3

Continuation of Enable SSL in a site - Part 2........

Installing SSL Certificate into IIS 6.0

Valid SSL trial version will send your mail and save that as a text file

Make sure you have 5 dashes to either side of the BEGIN CERTIFICATE and END CERTIFICATE and that no white space, extra line breaks or additional characters have been inadvertently added.

Note: Any of the following certificate file extension format is recognize by Microsoft IIS server - .txt, .cer & .p7b. In order to make sure that your certificate will install in any format we recommend using the .txt extension.
1. Open the Internet Services Manager (IIS):
a) Click Start
b) Select All Programs
c) Select Administrative Tools
d) Choose Internet Information Services (IIS) Manager
2. Under Web Sites, right-click your web site and select Properties.
3. Click the Directory Security tab.
4. Under Secure Communications, click Server Certificate.
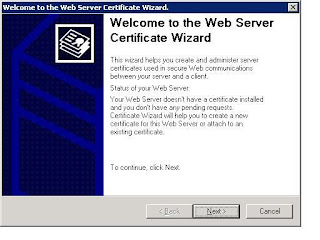
5. The Web Site Certificate Wizard will open, click Next.
6. Choose Process the Pending Request and Install the Certificate, then click Next.

Important: The pending request must match the response file. If you deleted the pending request in error you must generate a new CSR and replace this certificate.
7. Select the location of the certificate response file, and then click Next.
8. Read the summary screen to be sure that you are processing the correct certificate and then click Next.

9. You see a confirmation screen. After you read this information, click Next.
Stop and start your Web server prior to any testing.
Be sure to assign your site an SSL port (443 by default).
If you do not specify an IP address when installing your SSL Certificate, the same ID will be used for all virtual servers created on the system.
Enjoy

Enable SSL in site - Part 2

Continuation of Enable SSL in site - Part 1...........

Next Step is to install the trial root CA certificate in IE
  1. Click on the “ Download Secure Site Trial Root Certificate” link above.
  2. Save the certificate into a Notepad file with certreq1.cer extension.
  3. Open a Microsoft IE Browser.
  4. Go to Tools > Internet Options > Content > Certificates
  5. Click Import. A certificate manager Import Wizard will appear. Click Next.
  6. Browse to the location of the recently stored root (done in step 2). Select ALL files for file type.
  7. Select the certificate and click Open.
  8. Click Next.
  9. Select “Automatically select the certificate store based on the type of the certificate”. Click Ok.
  10. Click Next then Finish.
  11. When prompted and asked if you wish to add the following certificate to the root store, click Yes.

Note : Above steps are required only for trial version of SSL certificate. This is not applicable if it is paid valid certificate.


For Netscape Browsers

  1. Click on the “Secure Site Trial Root Certificate link” above.
  2. Save the certificate into a file with certreq1.cer extension.
  3. Open a Netscape browser.
  4. Go to Edit > Preferences > Privacy & Security > Certificates > Manage Certificates > Authorities.
  5. Click Import
  6. A dialog box appears that says, “Are you willing to accept this Certificate Authority for the purposes of certifying other Internet sites, email users, or software developers?”. Check “Trust this CA to identify web sites”. Click Next.
  7. Click Ok.

For Firefox Browsers

  1. Click on the “Secure Site Trial Root Certificate link” above.
  2. Save the certificate into a file with certreq1.cer extension.
  3. Open a Firefox browser.
  4. Go to Tools > Options > Advanced > View Certificates >Authorities.
  5. Click Import.
  6. Select the Trial Root certificate > click Open.
  7. A dialog box appears that says, "Do you want to trust 'VeriSign Trial Secure Server Test Root CA' for the following purposes?". Check "Trust this CA to identify web sites".
  8. Click OK.

Enable SSL in a Site - Part 1

Enable SSL in a Site - Part 1

If you want to implement 'https' in site, for the testing purpose you will get the trial SSL certificate from http://www.verisign.com/ssl/buy-ssl-certificates/free-ssl-certificate-trial/index.html

Give valid information and Verisign will send the trial version of SSL certificate to your mail.

Follow all the steps mentioned in site / in mail

Make sure you have a qualified domain name and application is in 80 port.

Following are way to convert http site to https

First step is Generate Certificate Signing Request (CSR)

  1. Login to the server, where application is hosted.

  2. Take start-> run

  3. Type 'inetmgr' and press enter

  4. Right click on the virtual directory displayed in IIS manager and from the context menu, click on properties

  5. Select the directory security tab


  1. Click on 'Server certificate'


7. Click 'Next'


8. Select 'Create New certificate' and click next


9. Select ' Prepare the request now and send later


10. Give the name and click next


11. Enter 'Organization Information' details


12. Enter the site's common name. This should be a valid domain name

13. Enter Geographical information and click next


14. Click next and request file summary page will load

15. Click next and Certificate completing wizard will come and click finish

You will get Certificate Signing Request (CSR) as a text file. Here it is 'certreq1.txt'

Tuesday, February 10, 2009

Upload file in MOSS / SharePoint using code

It is easy and simple to upload a file in the document library of MOSS / SharePoint. The code for upload the file in C# is as under: 


SPSite sp = new SPSite(“URL of the site collection”);     


SPWeb site = sp.OpenWeb();      


SPFolder folder = site.GetFolder(“Document Library Name”);     


SPFileCollection files = folder.Files; FileStream fStream = File.OpenRead(“C:\\upload.doc”); //path of the file to upload     


byte[] contents = new byte[fStream.Length];     


fStream.Read(contents, 0, (int)fStream.Length);     


fStream.Close();      


Hashtable MetaDataTable = new Hashtable();     


MetaDataTable.Add(“Comments”, “Hello World”);      


SPFile currentFile = files.Add(“URL of the document library/upload.doc”, contents, MetaDataTable, true); 


You can addd the meta data as well by using Hash Table. We have populated the “Comments” column with “Hello World”. 


With or without using the following code


 SPListItem doc = currentFile.Item;  


We can do a lot of things with the uploaded file.


For more information, visit the Microsoft link. It provides more information about the error checking and other.

Make the site Anonymous


If the site not anonymous, there is a simple way to make it anonymous

Solution

1) Open cenral administration

2)Take the application management tab

3)Click on 'Authentication Providers' link in Application Security section

4) In 'Authentication provider page click on 'Default Link'. Before clicking on 'Default' link, make sure 'Web Application' coming in right corner is the correct webapplication(Web application need to make anonymous)

5)Then 'Edit Authentication' page check the check box 'Enable Anonymous Access'

6) Click Save buttopn

7) Take the site url (Web application need to make anonymous) in new browser

8) Login using username and password

9) Take Site Action->Site Settings

10)In User and Permission section there is an additional link 'Advanced Permission' and click on it

11) In permission page click on 'Settings' and there is a menu item 'Anonymous Access'

12) Click on 'Anonymous Access' menu item and new page ' Change Anonymous Access Setting' page.

13) There you can make the Entire Web site anonymous.


Enjoy


Thursday, February 5, 2009

See the search result in XML format in MOSS 2007

Use the following code to see the search results in XML format.

<xsl:stylesheet version="1.0"
xmlns:xsl="http://www.w3.org/1999/XSL/Transform">
<xsl:output method="xml" version="1.0" encoding="UTF-8" indent="yes"/>
<xsl:template match="/">
<xmp><xsl:copy-of select="*"/></xmp>
</xsl:template>
</xsl:stylesheet>

Not able to view the customized master page, if the site is anonymous

Not able to view the customized master page, if the site is anonymous
Solution
Note : Make sure publishing feature of the site enabled
1) Log In to the site (As a site owner)
2) Take the Site Action
3) Site Action->Site Setting -> Modify All Site Settings
4) From Galleries->Click on 'Master Page and Layout
5) Customized Maste page will be listed there
6)Single click on Custom Master Page, a dropdown menu will come there
7)If it is not 'Checked In' , Check In first and publish it as a Major Version
8) Again come back to Master Page and Page Layout Galleries
9) Then 'Approve' the master from the option comes while clicking on custom master page
10) Now you can see the customized master page in "anonymous site'
Note : If you edit the master page using share point designer, in 'Master page and Page Layout Galleries, it will come as draft. So pls don't forget to publish it
Enjoy

The Java script code for searching people in MOSS 2007.

The following script will be useful in finding people in a MOSS 2007 site.

<script language="javascript">
function to handle enter on keyboard
function txtWildPeopleFinder_KeyDown(e)
{
if (e.keyCode == 13 || e.keyCode==10)
{
e.returnValue=false;
DoWildPeopleSearch();
return false;
}
else
return true;
}
escape apostrophes in search strings
function escapestr(str)
{
return str.replace("'","%22");
}

search function
function DoWildPeopleSearch()
{
var firstname = escapestr(document.all["firstname"].value);
var lastname = escapestr(document.all["lastname"].value);
var department = escapestr(document.all["department"].value);
var url;
var kString = "";

if(firstname.length > 0)
{
kString = "FirstName%3A" + firstname + "%20";
}
if(lastname.length > 0)
{
kString = kString + "LastName%3A" + lastname + "%20";
}
if(department.length > 0)
{
kString = kString + "Department%3A%22" + department + "%22";
}

url = "peopleresults.aspx?k=" + kString;
window.location=url;
return;
}
</script>

The following code gives the GUI code.

<table cellpadding="3" cellspacing="0" border="0" width="100%" ID="Table3">
<tr>
<td width="80" nowrap>
First Name:
</td>
<td width="100%">
<input size="20" maxlength="100" id="firstname" name="firstname" type="text" onkeydown="txtWildPeopleFinder_KeyDown(event)">
</td>
</tr>
<tr>
<td width="80" nowrap>
Last Name:
</td>
<td>
<input size="20" maxlength="100" id="lastname" name="lastname" type="text" onkeydown="txtWildPeopleFinder_KeyDown(event)">
</td>
</tr>
<tr>
<td width="80" nowrap>
Department:
</td>
<td>
<select id="department" name="department">
<option value="" selected></option>
<option value="Finance">Finance</option>
<option value="Human Resources">Human Resources</option>
<option value="Production">Production</option>
</select>
</td>
</tr>
<tr>
<td> </td>
<td>
<input type="button" onclick="DoWildPeopleSearch()" value="Search">
</td>
</tr>
</table>

Error showing while enabling Site Collection feature of newly created Site

Issue in enabling Site Collection feature of newly created Site
Solution
1) Take the IIS of the MOSS server
2) Open the web site folder , select the required web site and right click on it
3) Click the 'properties' from context menu
4) Click on 'Home Directory' tab
5) Change the current 'Application Pool' of the site to cental administration's application pool
6)Take your site and try to activate 'Site Collection Feature'
7)Then repeat the step from 1 to 4
8)Change the application pool from cental administration's application pool
to site's application pool
9) Then enable rest of site feature
After enabling publishing feature of the site, you can see more menu item in 'Site Action'
Enjoy

Wednesday, February 4, 2009

Remove 'Sign In' tag from anonymous site(Public site)


While making the site anonymous, a 'Sign In' tag will appear at the top right corner of the web portal. We can remove this by a simple way

Solution
Please find the following HTML code from required master page
and delete the code
--------------------------------------------
td valign="middle" class="ms-globallinks"
wssuc:Welcome id="IdWelcome" runat="server"
EnableViewState="false" wssuc:Welcome
td
--------------------------------------------

To logIn take the URL
http://www..com/_layouts/settings.aspx
Then site action will come
Enjoy

While trying to delete Master Page or PageLayout, showing an error 'Server Error : This item cannnot be deleted because it is still reference by other

While trying to delete Master Page or PageLayout, showing an error 'Server Error : This item cannnot be deleted because it is still reference by other pages

Here is the solution

1) Open the application in Sharepoint Designer
2) Expand Catalogue-> Master Page section where master page and page layout listed.
3) Create a folder say 'Need to Delete' by right clicking masterpage(Masterpage Gallery)-> New-> Folder
4) Cut the Master Pages or Page Layouts need to delete and paste it into 'Need to Delete' folder
5) Delete 'Need to Delete' folder
6) We can delete the required files without showing any error

Enojoy

How to create your own custom 404 error page and handle redirect in SharePoint 2007 (MOSS)?

People alway ask how to use their own 404 file not found error page vs. the generic one from IE in MOSS environment. The following example catches the 404 error and sends users to a redirect page.

Here's the steps:

1. In your MOSS server, make a copy of
%systemdrive%\Program Files\Common Files\Microsoft Shared\Web Server Extensions\12\TEMPLATE\LAYOUTS\1033\sps404.html
and call it my404.html

2. Create a Virtual Directory in IIS under your MOSS root web application. For example /errors

3. Create your own redirect aspx page, for example /errors/my404redirect.aspx and code your redirect logic in there. This is a normal asp.net page.

4. In my404.html, make the following change:
STSNavigate("/errors/my404redirect.aspx?oldUrl=" + requestedUrl);
5. Create a Console Application and insert the following code and run it in MOSS server
System.Uri webApplicationUri = new Uri(http://MyMOSSServer/);
SPWebApplication webApplication = SPWebApplication.Lookup(webApplicationUri);
webApplication.FileNotFoundPage = "my404.html"; //*note
webApplication.Update();
*Note: By default this is set to null. FileNotFoundPage needs to point to a html file that lives in %systemdrive%\Program Files\Common Files\Microsoft Shared\Web Server Extensions\12\TEMPLATE\LAYOUTS\1033. The file needs to be html only.

6. Now when you browse to a page that doesn't exist, you should expect to be brought to the redirected page.

*Another note:

In IE there's a "Show friendly HTTP error messages" setting which is ON by default in Internet Options->Advanced. With this setting on, sometimes your custom error page is not displayed. In order to override this setting, both my404.html and /errors/my404redirect.aspx from the above steps need to be larger than 512 bytes in size. Refer to the following KB about this setting: http://support.microsoft.com/kb/218155

* This seems to be working within a site collection context only, i.e. http://MyMOSSServer/sites/siteA if sites is a wildcard inclusion managed path and siteA doesn't exist in MOSS then this URL will NOT trigger the custom 404 error page set to SPWebApplication.FileNotFoundPage property.

Tuesday, February 3, 2009

Developing and Using Web User Control in Web Parts in MOSS 2007


1) Open a new ASP.Net Web Site and name it appropriately.


2) Add a Web User Control file and name it appropriately.


3) Design and create controls according to your need in ascx file.


4) Write the code at button click events as per your requirements.


using System;
using System.Data;
using System.Configuration;
using System.Collections;
using System.Web;
using System.Web.Security;
using System.Web.UI;
using System.Web.UI.WebControls;
using System.Web.UI.WebControls.WebParts;
using System.Web.UI.HtmlControls;

public partial class UserEntry : System.Web.UI.UserControl
{
protected void Page_Load(object sender, EventArgs e)
{

}
protected void btnSubmit_Click(object sender, EventArgs e)
{
string strName = txtFirstName.Text + " " + txtLastName.Text;
string strAddress = txtCity.Text + ", " + ddlState.SelectedItem.Text + ", " + txtCountry.Text;

lblResName.Text = strName;
lblResAddress.Text = strAddress;
}
protected void btnReset_Click(object sender, EventArgs e)
{
txtFirstName.Text = "";
txtLastName.Text = "";
txtCity.Text = "";
ddlState.SelectedIndex = 0;
txtCountry.Text = "";
}
}


5) Copy your both ascx and ascx.cs file in following path:

C:\Inetpub\wwwroot\wss\VirtualDirectories\80\UserControls

If UserControls folder is not present then create it.

6) Now open a new Web Control Library project and name it appropriately. Add reference of Microsoft.SharePoint.dll in your project. It is present at following path:

C:\Program Files\Common Files\Microsoft Shared\Web Server Extensions\12\ISAPI\Microsoft.SharePoint.dll


7) Open a Web Custom Control and name it properly.


8) Inherit Web Part class from System.Web.UI.WebControls.WebParts.WebPart.
Override the CreateChildControls method to load the previously created ascx Web Control.


using System;
using System.Collections.Generic;
using System.ComponentModel;
using System.Text;
using System.Web;
using System.Web.UI;
using System.Web.UI.WebControls;

using System.Web.UI.WebControls.WebParts;

namespace UserControl
{
[DefaultProperty("Text")]
[ToolboxData("<{0}:SPUserControlWP runat=server>")]
public class SPUserControlWP : WebPart
{
private Control _control;

protected override void CreateChildControls()
{
_control = this.Page.LoadControl(@"~/usercontrols/UserEntry.ascx");
this.Controls.Add(_control);
}
}
}


9) Create Strong-Name for project and build it.

10) Write following codes in your site web.config (i.e. C:\Inetpub\wwwroot\wss\VirtualDirectories\80\web.config) file.


Namespace="UserControl" TypeName="*" Safe="True" />


Note: For details regarding way to create strong name and copy version and PublicTokenKey, refer my earlier post.

11) Create webpart file for Web Part.


Cannot import this Web Part.


UserControl Web Part


A
demonstration using UserControl in a SharePoint
WebPart


12) Add the above created *.webpart xml file to your site.


Note: For details regarding the way to add Web Part, please refer my earlier post --- Developing Custom Web Part.


Suggested Link:

1) WebParticles: Developing and Using Web User Controls as WebParts in Microsoft Office SharePoint Server 2007
http://www.codeproject.com/spoint/WebParticles.asp

Welcome to MOSS Labs

Hello reader
Before you start your thoughts with MOSS Labs, we would be delighted to let you know the birth of this blog. We, a group of different minded people, had jointly faced some simple, complex, fascinating as well as challenging phases, while walking our first steps to know the wild jungle MOSS. Having gone miles from where we began, we thought of having a place to share our experiences and views in the subject, which would in a way, preserve what we have learned and let a beginner find the tips to start his journey as well.
Intention behind creation of MOSS Labs is not mere discussion or comments on topics posted. But, to put some light on various topics and techniques known and unknown to MOSS users irrespective of their experience level in the subject.
So, we gladly welcome you to this knowledge point.
Cheers
F3 MOSS aspirants